Outline the process for planning and designing an e-commerce site
Planning an E-commerce Site
Building an e-commerce site involves more than choosing a shopping cart platform and
uploading a product catalog. It requires a structured planning process that aligns
your business goals with the technical architecture needed to support them. Whether
you are launching a new online business from scratch or adding a selling channel to
an established company, the planning decisions you make early determine how scalable,
maintainable, and effective your site will be.
The options available for constructing and operating an e-commerce presence span a wide
range. You can build and host your own infrastructure using proprietary hardware and
software, share resources through co-location or managed hosting, or rely entirely on
third-party platforms and cloud services. Each approach has different cost profiles,
control levels, and operational requirements. As an e-commerce developer, your task is
to evaluate these options against the needs of your audience and the nature of your
products or services, then select and implement the combination that delivers the best
result.
The Four-Step Planning Process
The planning and design of an e-commerce site follows four principal steps. Each step
builds on the previous one, moving from business strategy through technical architecture,
user experience design, and finally to development and ongoing operations.
Step 1: Formulate Business Design Goals
Before any technical decisions are made, the business design goals must be clearly
defined. This means understanding who your audience is, what products or services you
are offering, how customers will discover your site, and what actions you want them to
take. Goals at this stage include defining the value proposition, identifying the
competitive landscape, setting revenue targets, and determining the e-commerce
functions the site must support — such as real-time inventory updates, customer account
management, call center integration, or subscription billing.
Well-defined business design goals serve as the reference point for every technical and
design decision that follows. Without them, development tends to drift, scope expands
without constraint, and the finished site may not meet the actual needs of the business
or its customers.
Step 2: Determine Back-End Server Components
With business goals established, the next step is to identify the back-end server
components required to support them. The back end of an e-commerce site is the
infrastructure that the customer never sees directly — the servers, databases, APIs,
middleware, and business logic that make the front end functional.
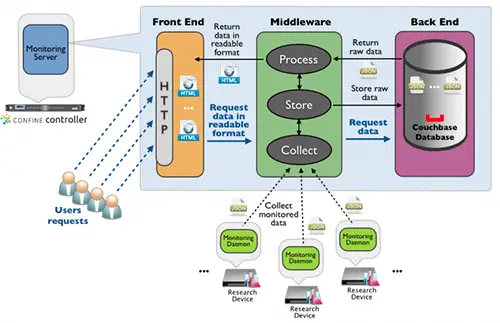
A typical e-commerce back end operates across three tiers:
Front end — the web server layer that delivers pages and assets
to the user's browser
Middleware — the application layer that processes business logic,
handles authentication, manages sessions, and coordinates between the front end and
the data layer
Back end — the data layer, including the database, file storage,
and integrations with third-party services such as payment processors, shipping
providers, and inventory systems
The specific components chosen depend on the business goals identified in Step 1.
A site handling thousands of transactions per day requires different infrastructure
than a small catalog site with occasional orders.
Figure 2: The three-tier architecture of an e-commerce monitoring and application
server — front end, middleware, and back end. Determining which components are needed at each
tier is the second step in the planning process.
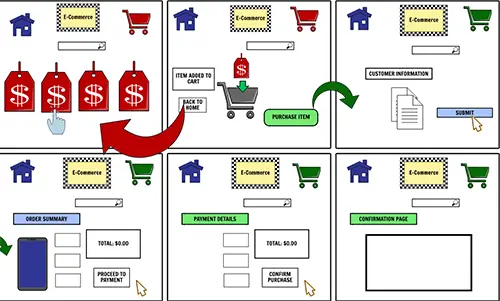
Step 3: Choose Front-End Archetypes and Develop a Storyboard
Once the back-end requirements are defined, attention turns to the front end — the
interface that customers will actually interact with. This step involves selecting
front-end archetypes (the structural patterns and page types the site will use) and
developing a storyboard that maps the user journey through those pages.
A storyboard for an e-commerce site typically covers:
Home page and category landing pages
Product listing pages with filtering and sorting
Individual product detail pages
Shopping cart and checkout flow
Account creation, login, and order history
Search results pages
Error pages and empty-state handling
The storyboard should trace the path from first visit through purchase completion,
identifying every decision point the user encounters and ensuring the navigation
structure supports the three-tier hierarchy of Category, Subcategory, and Product.
Figure 3: A storyboard maps the front-end archetypes to business design goals and
back-end architecture, ensuring that user-facing pages align with the technical infrastructure
behind them.
Step 4: Develop, Test, and Implement the Site
With goals defined, architecture specified, and the user experience mapped out,
development can begin. This phase translates the storyboard into working pages and
connects those pages to the back-end components identified in Step 2. It is not a
one-time event — development, testing, and refinement form a continuous cycle that
continues well beyond the initial launch.
Key activities in this phase include:
Building and integrating the front-end templates and components
Connecting to payment gateways, shipping APIs, and inventory systems
Implementing security measures including TLS encryption, input validation,
and authentication
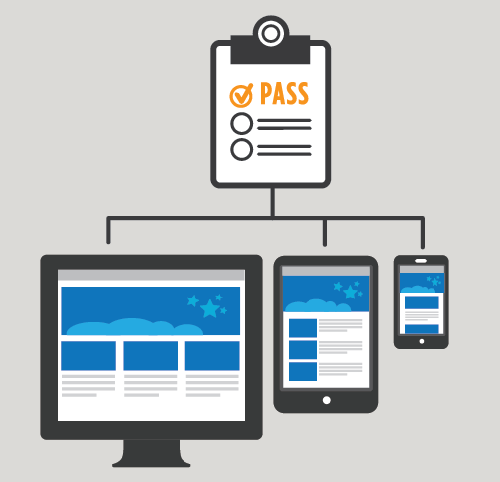
Conducting functional testing, load testing, and cross-browser compatibility
testing
Launching with a staged rollout or A/B test where appropriate
Monitoring performance and user behavior post-launch and iterating based on
analytics and customer feedback
Figure 4: Develop, test, and implement the site. Once the initial development of
an e-commerce site is complete, testing and improvement become an ongoing operational
process.
Eight Steps to Planning an E-commerce Site
The four-step planning process above maps to a more granular eight-step implementation
checklist that covers both the business and technical dimensions of building a site:
Define your target audience and product offering — understand who
you are selling to, what they need, and how your products or services meet that need
Research and analyze your competition — identify competitors, assess
their strengths and weaknesses, and define how your site will differentiate
Choose a platform to build your site on — evaluate e-commerce
platforms (such as Shopify, WooCommerce, Magento, or a custom build) against your
technical requirements, budget, and scalability needs
Design and develop your site — implement the storyboard, build
front-end templates, integrate back-end systems, and connect third-party services
Set up payment and shipping options — configure payment gateways,
define accepted payment methods, integrate shipping carriers, and set shipping rules
and rates
Test your site for functionality and usability — conduct end-to-end
testing of the purchase flow, test on multiple devices and browsers, perform load
testing, and validate security configurations
Launch your site and promote it through marketing and SEO efforts —
execute the go-live plan, submit sitemaps, configure analytics, and begin marketing
campaigns
Continuously monitor and improve your site through analytics and customer
feedback — track conversion rates, page performance, and user behavior; use
the data to prioritize ongoing improvements
Each step requires careful consideration of both technical and business issues. As you
work through each stage, keep in view all three layers of the site: the user interface,
the front end that customers see and interact with, and the back end that makes it all
work.
Front-End and Back-End Architecture
In an e-commerce context, the front end is the customer-facing interface — the pages,
navigation, product displays, shopping cart, and checkout experience that users interact
with directly. The back end is the server-side infrastructure: the application servers,
databases, APIs, and business logic that power the front end without the customer ever
seeing them.
A practical example: a successful account login page on the front end requires all of
the following on the back end:
A server-side scripting layer to process the login request
TLS encryption to protect credentials in transit
A database to validate the submitted credentials against stored account records
Session management to maintain the authenticated state across pages
Common open-source database options for the back end include PostgreSQL and MySQL. Cloud
environments increasingly use managed database services such as Amazon RDS, Google Cloud
SQL, or Azure Database for MySQL and PostgreSQL, which reduce the operational overhead of
maintaining database infrastructure.
Front-End Architecture Features
A well-structured e-commerce front end is built around these principles:
Three-tier content hierarchy — Category / Subcategory / Product —
provides a predictable browsing structure that both users and search engines can
navigate efficiently
Clear navigation — menus, breadcrumbs, and search make it easy for
users to find what they are looking for without dead ends
Integration with the existing site — the e-commerce section should
match the visual identity and navigation conventions of the broader site
Flexible navigation structures — the ability to support multiple
navigation paths (by category, by brand, by use case) accommodates different user
intent patterns
To assist you in the planning process, a technical checklist is available to help you
evaluate your e-commerce infrastructure needs. You will learn more about mapping business
issues to technical decisions throughout this course.
In the next lesson, you will learn how to formulate business design goals.